Tiling has proven to be an effective way for so many different people to have their home “pop-out” a lot more, including me. As someone who has done tiling projects in the past, here is a great step-by-step method on how to set yourself up for success!
1. Prepare Your Home For Tiling
- Start by thoroughly cleaning your surface from dust or dirt. Using a sponge and water will satisfy this step. If not done properly, the dirt will stick to the adhesive (and not the surface) and your tiles will eventually fall off or not stick. Source
- Along with this, be sure there is no wallpaper or paint insight.
- Generally, you should not stack bricks on top of each other. They should be removed, as the weight can break off the old adhesive over time. If you do decide to stack bricks on top of each other, “you should treat your old tiles with a grinding disc and clean the wall once done. This way you’ll provide a better surface for the adhesive to bond.” Source
- Going along with this, do not try to align the second round of bricks with the first round of grouting lines. Source
- Use spackle or any other related chemical to fill in any holes in your wall. It is important to be sure that every surface is filled in or else the adhesive will not apply to the surface. Source
2. Completely Level Your Wall
This step is critical! You will not be able to progress with the project without making sure your tiles are completely level!
Ways To Ensure Your Wall Is Completely Leveled:
- Use a long piece of flat timber and place it against the wall, checking for bumps or any irregularities. This method is the best way to level your wall as it is tall enough to measure a large amount of your wall. If your board is not completely straight and doesn’t slant or dip at all, you should be good to go. Source
- Use a leveler. Make sure the device is calibrated correctly and follow the instructions depending on the kind you use.
- Use the tiles you will use for your project. If the tiles don’t slant, you should be good to go!
Keep In Mind:
- Even after you complete the process of leveling your wall, be sure to go over your wall with 220-grit hand sandpaper just to be sure it is completely ready for the tiling. Be sure to remove any bumps or crevices of the wall. Source
- Be sure to check the surrounding walls not involved with the tiling project and make sure they are completely leveled as well. A crooked wall mixed in with a refurbished wall could clash and ruin the aesthetic of your home project. Source
3. Plan Out The Tiling Project
- Measure the square footage that you would like tiled. Doing these steps can best help you prepare to get the correct amount of tiles and adhesive that you will need for this project to be successful.
- Give yourself ample workspace.
- Be sure to check Step 4 and gather the extra supplies you will need for your surface to be sustainable for your tiles.
How To Measure Square Footage For Tiling
- Measure alongside the edges of the space you are tiling. Locate the longest side first and extend your tape to the other side of what you are measuring.
- Stick with the biggest shape first, then work your way towards any irregularities in your surface (f.e. if your wall is shaped like a square with a corner sticking out, measure out one side first then apply that to the other side as well).
- Apply the formula for finding the square root by multiplying the length and the width of your surface.
- Account for the odd dimensions mentioned in Step Two.
- Order 5-10% more tiles than you need just in case you were wrong with your calculations or if you make any mistakes with applying your tiles. Source
4. What Type Of Surface Will You Use?
Some surfaces require different means of preparation. Keep these things in mind and gather these materials if applicable.
- Using wood? Wood requires a coat of polyurethane paint before it is applied.
- Using freshly applied drywall, concrete, or plywood? You will need to wait at least thirty days for concrete and plywood to dry and at least a month for drywall to dry before reapplying the surface.
- Are you tiling a bathroom, kitchen, or other rooms prone to water? You will need to use a waterproofing sealer. Waterproofing sealer takes a couple of coats for the material to completely settle in, and each coat takes about a day to dry-so plan accordingly. Source
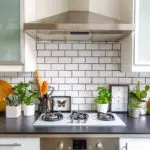
5. Choose The Best Wall Tiles
There are so many different factors that you will need to consider before you start tiling your walls. Here are a few key factors that many consider:
What colors are surrounding your space?
Be sure to choose colors that will match and/or compliment the hues already in your home.
What pattern would you like to have?
- Use the “stacked pattern” to have more of a traditional look. This look is by far the most popular tile design and is known to “pop-out” and have more of a stunning effect. Source
- Use a checkerboard pattern when if you want more of an older, esthetic look. The checkerboard pattern will have each color diagonal to each other. This pattern will definitely pop out though, so if there are plenty of other designs or colors in your space it is best to avoid this pattern. Source
- Use a running board pattern for a more untraditional look. All you will need to do for this pattern is flip your tiles horizontally. Source
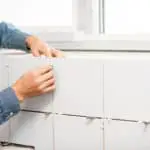
6. Trim Your Tiles If Needed
Layout the tiles you will use on a table or other surface, and measure out your tiles to be sure it fits the square footage. You might need to trim some of the edges of your tiles to be sure the tiles fit appropriately. Source
The best ways to cut tiles are through wet saws, tile nippers, drills, and angle grinders. Each tool has a different way of using it. Source
Choose The Best Adhesives
Here are the most popular adhesives for tiling, listed from greatest to least, and some things to keep in mind about each of these adhesives.
The best adhesives are the ones that fit the circumstances and skill levels of your project the best.
Thinset Tile Mortar:
- “Thinset is a mortar that is made of Portland cement, silica sand, and moisture-retaining agents.” Source
- It has a smooth consistency which makes it very easy to work with.
- It is sually used with a notched trowel. Source
Standard And Pre-Mixed Thinset:
- Bagged powder using various materials.
- Mortar is bagged up mixed, so it requires no proper pre-work.
- You will need to use the material all at once. Source
Thinset Mortal Pros and Cons:
- Typically used for outdoor tiling
- “Thinset is a mortar that is made of Portland cement, silica sand, and moisture-retaining agents. Thinset tile mortar has a smooth, slippery consistency, similar to mud.” Source
- This adhesive is ideal for bathrooms and other materials. Source
Expoxy Tile Mortar:
- Epoxy-based mortars have high compressive strength and stick well to resin-backed stones.
- The material is simple to use and easy to maintain.
- The material has a very low shelf life. Source
7. Apply Adhesive
This is the specific process in which you can apply adhesive.
What you will need: Safety gloves, measuring tape, a notched trowel, a margin trowel, and a bucket.
- Put the adhesive in a clean bucket and mix the material using a margin trowel. Mix it till there are no lumps and the consistency is correct.
- Next, use your margin trowel to apply the tile adhesive to a notched trowel. Wear gloves while you are doing this as the adhesive can react poorly to the skin, and be sure to wear grubby clothing and apply slowly and thoroughly.
- Spread the adhesive on the surface. Hold the trowel at a 45-degree angle and move it several times (like applying paint) till the adhesive is even with the surface it is applied on.
- Comb the adhesive using a notched trowel. Be sure to still hold it at a 45-degree angle so it can spread properly.
- Repeat the process so the entire tile is completely even with the tile against it. The adhesive should spread to every corner of the tile. Add more adhesive if necessary to completely level your adhesive.
- Lay the tiles and hammer them in using a mallet. Do not hit them too hard or they will break. Use spacers between the tiling to be sure it is consistently level.
Additional Tips:
- It is best to apply it to the back of the tile as opposed to the back of the wall. However, if you decide to apply the tiles to the back of the wall, be sure to only spread the adhesive precisely to the parts where you would like the tiles to go. Tile adhesive does not come off cleanly.
- To add to this, be sure to also apply your tile adhesive to your wall in chunks, as the adhesive dries really quickly and won’t stick to your wall as well in a long period of time.
- Double-check each surface to be sure it is leveled before you spread the adhesive. Source