
You are able to paint sliding wardrobe doors, through these simple steps:
1. Prepare Your Work Space
Prepare the area where you will work by covering up the surface where you would not like paint.
Prepare by gathering appropriate materials. You will need a screwdriver (to loosen the door, sandpaper, a dust mask, safety goggles, a vacuum, damp cloth, sugar soap, primer, painting supplies (a set of painting brushes and a roller), and free space to put a door in a horizontal position. Source
Prepare to pick the perfect color! Select a color for your sliding wardrobe doors that will fit the colors that are already surrounding your home. This will give your bedroom an overall universal feel. Here are a few styles to consider:
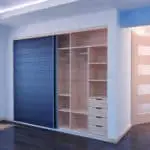
- “Monochromatic schemes: Colours from the same scheme will complement each other quite naturally.
- Cool Colour Tones: Blue base colors are considered “cool” as most people associate the color with cooler things. Blue is also seen as a relaxing color, which makes it perfect for the bedroom.
- Muted Colours: Pick subdued tones for your room that make it easier for you to calm down.
- Neutral Hues: The more neutral the color, the better. These colors always mix well with any environment and make it more of a comforting atmosphere for guests!” Source
- Chalkboard: Some individuals have found that using chalkboard paints for sliding doors is a fun and practical option for sliding doors. The best type of chalkboard paint is Rust-Oleum Branded. Source
Veterans recommend melamine paint as it is best suited for sliding doors. Source. Melamine is popular for its durability, large variety of colors, a uniform finish, and to top it off one of the cheaper paints on the market.
2. Remove Each Of The Doors
Each process to remove the sliding doors is different, depending on how the sliding doors were built. However, the typical method to remove sliding doors is listed below for clarification:
- Pull the sliding doors against one side of the wall. Use another individual to secure the side where the doors are on, so the structure doesn’t fall over or parts of the wood don’t chip.
- Screw off all the track’s screws except the middle screw (the track is the bottom piece of your sliding doors that feeds the sliding door together) of the side that doesn’t have the sliding door.
- If applicable, take off that side of your sliding door. Sometimes, you will need to unscrew the wheels a bit so it can come off easier.
- Be sure to have another individual stabilizing the doors to be sure it doesn’t fall over.
- Repeat steps 1-4 for every piece of your sliding door
- Take off the center screw and detach the track, if necessary. Source
Place the doors on a nice, even surface where it can not get scratched as you paint it.
3. Smooth The Door’s Surface

You may not think an interior door wouldn’t need much sandpaper, but you will need to completely scrape off any loose paint before beginning anew. Be sure to purchase fine-grit sandpaper (120 to 220-grit) to ensure a smooth, practical surface.
If your wardrobe doors have cracks, be sure to fill those in before you start painting. If not addressed now, the cracks could make the wardrobe doors harder to function in the future.
Filler sticks fill unneeded cracks well, and you find those in most online or home retail stores.
This is where the masks come in! Be sure to wear your dust mask and safety goggles while you are sanding to avoid taking in any unnecessary toxins. Source
4. Clear Off Dirt/Grime From Door
Make sure the surface is completely clean! Be sure to clean up any extra dirt and make extra room for the next step. Experts recommend gently vacuuming up over each surface of the door to be sure to get every last bit of sawdust off your doors. After that, use some sugar soap with a soft cloth to eliminate any sort of grime. Source
5. Prime Door
Priming doors have more of a particular process.
- Individuals recommend using a narrow brush to paint inside crevices and corners first, applying a smooth, even coat.
- Next, use a wider brush to prime the flat areas of the door. Allow one side to dry before going onto another side.
- Sand the primer coat again lightly with 120-grit sandpaper after it dries completely. Sanding removes slight unevenness in the primer and roughens the surface slightly so the final coats of paint adhere better. Wipe the sanding dust from the door and paint it the desired color. Source
6. Paint Door
Some friendly tips while you are painting:
- Be sure to lay the door completely flat to prevent spillage.
- Be aware of subtle “paint buildup” around your door. Even despite your best efforts sanding, there still may be very little bits of stuck paint throughout your doors. Some make the mistake of not checking thoroughly enough then they end up with a slightly discolored door. Do not make that mistake, be sure to check your door thoroughly before you start another coat of paint.
- Search for flaws in your priming. Be sure that every crevice is covered evenly. If you made a mistake, use a spackling compound to cover it up, resand, start again, and use a brush to spread it evenly throughout the rest of the priming.
- For the best results, lightly go over with a hand sander between each coat of prime and paint for the best results. Source
7. Reattach Door
Once you have made sure your door is completely dry and in the position you would like it, set up your wardrobe sliding doors back to the position it initially was. Again, there are many types of sliding doors, but here is a typical method:
- Start by putting all of your screws back in place. Start with putting the trackback on (if taken completely off),
- Then, start putting each side of your sliding doors back on.
- Test out the tracks to make sure they are working as you put each side on.
- Test the entire sliding wardrobe door to make sure it is secure, then you are all set!